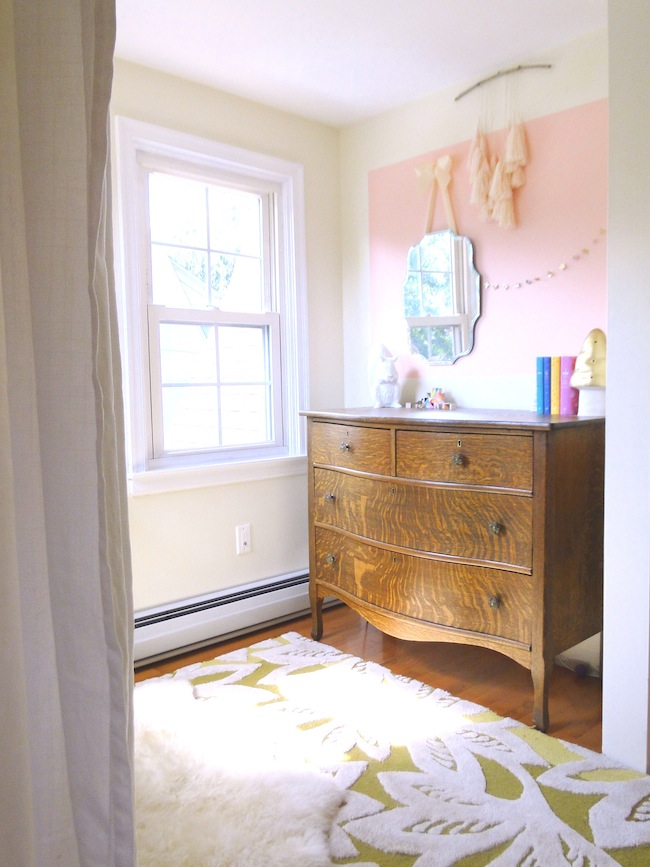
We've been working for what feels like ages on my daughter Violet's big girl room. It was a slow transformation from what I've dubbed a 'zebra bordello' to what we have today. (If you're curious you can see the
before's over on my personal blog here). With a toddler running around we don't have much time, and our budget was tight, so we did things slowly and over time.
The starting point for the room was actually the rug. I had purchased it years ago on clearance from Anthropologie, and while I still love it, it no longer worked in the space for which it was originally intended. So rather than wasting a perfectly good rug, we decided to use it in the one unfinished space in the house - Violet's room. Working around this rug was a bit of a challenge for me. It definitely limited my color palette, as there aren't a huge amount of colors that go with chartreuse green. I was saved when I came across
this lovely color palette over on
Creature Comforts.
I was actually pretty excited to use pink, as I definitely did not use traditional girly colors in
her nursery. I knew that I didn't want the walls to be pink just in case she got a little older and decided she hated pink, so we went with a creamy neutral. That left me with the bedding and dresser to douse in as much pink as I pleased. I originally scoured Craigslist in search of an inexpensive antique dresser to paint
like this one over on
Making it Lovely. But when I finally found the right piece, I just couldn't bring myself to paint over that beautiful wood. Despite that I still felt that the space needed a pop of pink, so I painted a color block behind the dresser instead.
On the other side of the room I went in search of pink bedding. I hit the jackpot when I came across this lovely polka dot bedding over on
House 8810. I gave Violet a billion pillows, because she loves to have pillow fights and make pillow beds on the floor. (Thanks to her Aunt Nikki and Nonny) I made two of them myself from linen that I purchased at a local fabric store. The
sheets were purchased at
Land of Nod and the larger sham came from
Restoration Hardware (on sale). The smaller pillows were from
Land of Nod,
Etsy and
Pretty Little Things by Lori Marie. At that point the room was starting to feel really traditional, and I prefer a combination of traditional and modern, so I mixed things up a bit with
a modern bed from
West Elm and
bench (actually part of a closet system) from
IKEA. I made the bench cushion myself - I purchased two-inch foam (on sale at 50% off!) from Joann Fabrics, used some left over fabric from my daughter's nursery, and pinned it all together. Eventually I'll get around to sewing it, but I ran out of time before we left for our vacation. It's holding up fine for now! :)
On the largest wall I went with a pull-down map that I found on eBay for $5. I had originally purchased it with the plan to paint over it, but the Mister convinced me to save it. (Luckily the colors happened to go quite well in the space). I'd been coveting
this Up poster from Fine Little Day for quite some time, so that went up on the wall as well, as well as this
Adventurers screen print from Fifi du Vie. These
removable wallpaper decals from Love Mae jumped out at me on Pinterest and I thought they'd be perfect in the small space above the bench. The last wall that needed something was above the bed. I really wanted to use
this Daydream wallpaper by Julia Rothman for Hygge & West, but I had hit my budget limit at that point. So I decided to freehand a similar mural myself ($2.80 for a paint sample jar from Home Depot) I went with a minty color for the simple fact that I'm completely obsessed with it at the moment.
I didn't have any particular theme in mind for the space - I just put together things that I love and that I thought Violet would love as well. Overall I'm pretty happy with how the space turned out, and Violet loves playing in there until we make the move out of her crib. (Very nervous about that!)
This post got a lot longer than I had planned, so I'll list all of the sources below and if you have any questions let me know!
xo, Lauren
Narrow Leg Bed -
West Elm
Dottie Quilt -
House 8810
Dresser -
Craigslist
Bench -
IKEA
Bench Cushion - DIY
Bench Fabric -
Jo-ann Fabric
Zinc Letter 'V' -
Anthropologie
Gray Sham -
Restoration Hardware Baby & Kids
Pink Polka Dot Sheets -
Land of Nod
Striped Pillow -
Urban Ecology
Floral Pillow -
Skinny LaMinx
Star Pillow -
Hello Milky
Large Round Pillow -
Land of Nod
Small Round Pillow -
Pretty Little Things by Lori Marie
Linen Pillows - DIY (Fabric from
Joann Fabric)
Doll -
Pretty Little Things by Lori Marie
Dancer Bear -
Lieschen Mueller
Map -
eBay
Adventurers Print -
Fifi du Vie
Bear & Antler Hooks -
West Elm
Christy's Cottage Dollhouse -
Melissa & Doug
Bedside Shelf -
Michael's Craft Store
Umbra Horizon Crunch Cans -
Container Store
Up Poster -
Fine Little Day
Book Shelf -
IKEA
Star Pillow -
Colette Bream
Swallows Wallpaper Decals -
Love Mae
Curtains -
IKEA
Large Rug -
Anthropologie
Faux Sheepskin Rug -
IKEA
Eleanor Frameless Mirror -
Pottery Barn
Star Garland - DIY
Tissue Paper Tassel Mobile -
FleurLux
Squirrel Lamp -
Anthropologie
Gold Mushroom Lamp -
Mokkasin
Handpainted Blocks -
How Now Design
Gnome -
MOMA Store
Terrarium Postcards -
Quill and Fox


 Posts
Posts